How do I disable the Windows loading splash screen?
Question
How do I disable the Windows loading splash screen?Answer
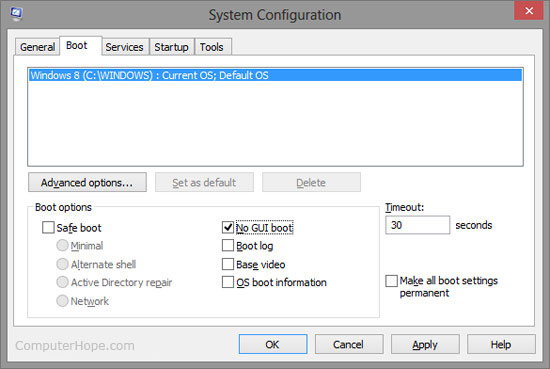
To disable the Windows splash screen that shows the process of Windows loading as it is starting follow the below steps.- Click Start and in the run box or Search for programs and files type msconfig and press enter. If you have Windows 8 type msconfig from the Windows 8 start screen.
- Click the Boot tab. If you do not have a Boot tab skip to the next next section.
- In the Boot tab check the "No GUI boot" option.
- Click Ok and the next time Windows starts the loading Windows splash screen should not appear.
If you're running an earlier version of Windows, such as
Windows 2000 or Windows XP the boot tab will not be in the msconfig or
System Configuration utility. To disable the GUI boot in these versions
of Windows requires you edit the boot.ini file and add the /noguiboot
option. In msconfig this switch can also be enabled through the BOOT.INI
tab.
***Additional information and help with the boot.ini.
Issue
Additional information and help with the boot.ini.Additional information
The "boot.ini" is a Microsoft initialization file found on the Microsoft Windows NT, Microsoft Windows 2000, and Microsoft Windows XP operating systems. This file is always located on the root directory of the primary hard drive. In other words, it is located at C:\ directory or the C Drive. This file is used by Microsoft Windows as a method of displaying a menu of operating systems currently on the computer and allowing the user to select what operating system to load. In addition, this file is also used to point to the locations of each of the operating systems.
How to view the boot.ini
Examples of the boot menu
Basic example of the boot.ini file
How to modify the boot.ini
Available boot.ini switches
How to rebuild the boot.ini
Examples of the boot menu
Basic example of the boot.ini file
How to modify the boot.ini
Available boot.ini switches
How to rebuild the boot.ini
The boot.ini can be viewed and some options can be changed by following the below steps.
- Click Start, Run
- In the run line type: msconfig and press enter.
- Click the boot.ini tab.
Tip: If
you have an option in the boot menu that doesn't work, such
as a missing version of Windows. Try clicking the "Check All Boot
Paths" button in the boot.ini to fix this issue without having to
manually
edit the boot.ini as instructed below.
If multiple operating systems are setup in the boot.ini, as the
computer is booting you will see a menu similar to the below example.
This allows
the user to select between multiple operating systems. If your
computer does not have multiple operating systems, but this menu still
appears each time
your computer boots, it is likely that your boot.ini is improperly
configured.| Please select the operating system to start:
Microsoft Windows XP Home Edition
Microsoft Windows 2000
Use the up and down arrow keys to move the highlight to your choice.
Press ENTER to choose.
For troubleshooting and advanced startup options for Windows, press F8.
|
timeout=5
default=multi(0)disk(0)rdisk(1)partition(1)\WINDOWS
[operating systems]
multi(0)disk(0)rdisk(1)partition(1)\WINDOWS="Microsoft Windows XP Home Edition" /fastdetect
In the above example, the boot.ini contains two sections, the [boot loader], and [operating systems]. Within the boot loader section there are two lines. The "timeout" line is used for how long the boot menu time should be displayed, in seconds; we recommend that the timeout be set to at least five if you wish the computer to boot faster and commonly use the default operating systems. The "default" line is the default operating system that the boot.ini will load. If multiple operating systems are in the boot.ini, the default operating system will be automatically selected and used if the user does not specify a different operating system by the time the timeout value expires.
The next section, or the "operating system" section, is used to list and specify the location of each of the operating systems installed on the computer. Below is a listing of each of the options.
| Option | Description |
|---|---|
| multi(x) | This option is used with IDE and ESDI
drives and is also used with
SCSI drives for computers using Windows NT. The number used in the
above example is "0", this number is the adapter's number and
should always be "0" for computers that rely on the BIOS to load system files.
|
| scsi(x) | If the computer has a SCSI controller and is not using BIOS to load the system files, the boot.ini may have "scsi(x)" instead of "multi(x). |
| disk(x) | The disk on the controller. If multi(x) is used used, this value will always be 0. However, if scsi(x) is defined, this value will be SCSI address. |
| rdisk(x) | Which disk on the controller is being used. In the above example we are using an rdisk of "1", which indicates the second disk on the primary controller is being used. This value may be between "0" and "3" and is always set to "0" when "scsi(x)" is being used. |
| partition(x) | Which partition the operating system is on. In the above example, the operating system is on the first partition of the drive. |
| \WINDOWS="..." | Finally, the last portion of this line defines the directory of where windows is located and what the boot menu should display as the operating system. In the above example, the boot menu would display "Microsoft Windows XP Home Edition" as a selection. |
- From Windows, open an MS-DOS prompt by clicking "Start" and then "Run" and typing "cmd" in the text box. If you are not able to get into a MS-DOS prompt to edit the boot.ini file, boot into the recovery console to edit the file.
- At the MS-DOS prompt, type:
c: <press enter>
cd\ <press enter>
attrib -r -a -s -h boot.ini <press enter>
edit boot.ini <press enter>
- Additional information about the attrib command can be found on our attrib help page.
- Additional information about the edit command can be found on our edit help page.
| Switch | Description |
|---|---|
| /basevideo | Causes the operating system to use a standard VGA display when booting into the operating system. |
| /bootlog | Creates a log file named ntbtlog.txt of the computer booting. |
| /burnmemory | Causes the operating system to ignore the memory specified after the switch. For example, "/burnmemory=64" instructs the operating system to ignore 64MB of physical memory. |
| /debug | Causes the kernel debugging to be enabled. |
| /fastdetect | Causes NTDETECT to not detect serial and parallel devices and instead let Plug and Play handle detection. |
| /maxmem | Limit the operating system to use the maximum memory of what the user specifies. For example, "/maxmem=32" instructs the operating system to use a maximum of 32MB. |
| /noguiboot | Microsoft Windows 2000 and above switch that, if enabled, will not load the graphics driver to display the graphic as Windows is starting |
| /nopae | Microsoft Windows 2000 switch that disables the computer's ability to utilize Intel Physical Address Extensions. |
| /numproc | Instructs the operating system on how many processors it is capable of using. |
| /onecpu | Causes the operating system to utilize one of the processors in a multi-processor computer. |
| /pae | Microsoft Windows 2000 switch that enables the computer to utilize Intel Physical Address Extensions. |
| /pcilock | Prevents the operating system from automatically assigning IO/IRQ resources to PCI devices. |
| /safeboot | Boot the computer safely (Safe Mode). This mode can also be accessed without modifying any files by pressing the "F8" key as the computer is booting. |
| /sos | Causes the operating system to print out information as it being processed. |
| /w95 | Used when booting Windows 95 or Windows 98. |
| /w95dos | Used when booting MS-DOS. |
| /year | Option used to cause the operating system to ignore the year provided by systems the real-time clock and instead utilize the year specified after the switch. For example, a user may type /year=2003. |
No comments:
Post a Comment